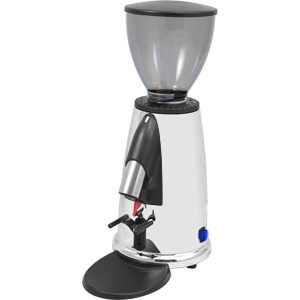
All posts by CoffeeNerd

Gaggia Classic Espresso Shot with Good Grinder

I did a video with the Gaggia Classic and a budget grinder to prove you could get a really nice shot with a setup that you could get out the door with at about $500.

Macap M2M
Macap M2M

So, now, here’s the reason you always hear people talk about the grinder, grinder grinder, when giving advice on making better espresso at home.  Here’s a shot with the Gaggia Classic and a good grinder, the Macap M2M.  This setup is closer to $1000 out the door new (machine and grinder).

Note that I did use a slightly different technique here and different beans, but that really made little difference to the overall outcome.  In the budget shot, I used a single origin, natural process Sumatra bean…which produces great crema.  In this shot I used a blend, but plain and simple, the better grinder yields a better shot.

Starbucks Rewards Revamp

Starbucks LogoStarbucks is pulling a fast one folks!!! You already know I don’t like their coffee…in fact it’s total crap. But, they apparently are taking advantage of the fact that most people can’t do simple math anymore with their new Starbucks Rewards program.
They are revamping their Starbucks Rewards system starting April 1st…because “we listened to you”. Instead of 1 star per visit, it’s now 2 stars per dollar you spend…ok…so what? Instead of 30 stars to Gold level, it’s 300 stars…wait…hold the phone…menu please?
I’ll round a bit here to make the math easy, but a cup of coffee is $2 (forget all the fancy-schmancy drinks). So, with the old program, a coffee a day for 30 days got you Gold level for a total of $60.
Under the new program, Gold level costs you a flat bargain price of $150!!! So, for the addicts, this is good news, they will reach Gold faster and not much changes. For the people like me that got an ice tea once in a blue moon…no Gold for you (and no rewards either!)  Starbucks just pocketed a shitload more money out all of you…because they guarantee at least $150 is spent before rewards are reached.

New Grinder! Macap M2M

Macap M2M
Macap M2M

I just got a new grinder and boy am I happy.  It is the Macap M2M Espresso Grinder.  I picked it up at 1st Line.  This is labeled as a “commercial” grinder.  And I can see that working in a small cafe.  But, it’s not fast enough to work in a really high volume shop.   However, the Macap M2M is built like a tank, and the small footprint is excellent for home application.  You can read my full review here.

Gaggia Classic Espresso Shot with Budget Grinder

So, you want to stay on the cheap, and you’re wondering if you can actually get a decent shot of espresso.  Yes, yes you can.  Keep in mind that “cheap” is quite relative your your situation, but the combo of a Gaggia Classic with a Capresso Infinity grinder can produce a very respectable beverage.

All told, you can be out the door under $500 and brewing cafe quality beverages at home.

Latte Art with the Gaggia Classic

Some people will tell you that you HAVE to spend at least $500 on the grinder alone, or to get a Rancillio Silvia.  But, your wallet is the deciding factor.  Yes, the grinder DOES make that big a difference even on a lower end machine.  So, if you can afford it, get a better grinder.  But, if you have a budget of $500, this solution right here is a damn fine choice. 

Time for a Gaggia Classic

I decided that the ROK wasn’t going to cut it anymore in my apartment in NY and I needed to upgrade to a machine that still had a budget price, but could keep me from missing my Bezzera BZ10 so much.  I picked up a Gaggia Classic espresso machine (review here) and I am happy.

Gaggia Classic and Capresso Infinity Grinder

I did the Rancillio steam wand mod immediately and I highly recommend you do it too.  This machine is small, but performance is superb.

Brewing Myth – Brew Water Too Hot

The brewing myth goes something like this:  If you use boiling water you will “burn” or “scald” your coffee thus making it bitter.

This, for lack of a better word is complete bullshit.  Coffee is roasted at temperatures approaching 500 degrees F.  212 degree water cannot burn the ground coffee.  It’s physically impossible.

So, why do you end up with bitter coffee if the water is too hot?  The answer is quite complex, but simple at the same time.  Extracting coffee is a chemistry project.  The water dissolves elements of the bean and the result is brewed coffee.  Like most chemistry projects, time and temperature affect the end result.  If you use water that is too hot, you will extract the parts of the bean that are bitter first and the rest of the yummy part will be over shadowed.  But, you can get this same result using too fine a grind or too long a steep.

So, yes, brew water too hot will give you a bitter result, but it’s NOT because the grounds are being burned.

Culture 36 (Culture Espresso)

Culture 36 is the 36th street location (between Broadway and 8th Ave) for Culture Espresso (main store on 38th near Bryant Park). One of my tests when I walk in to a shop is to ask, “how are you dosing your portafilters?”  If I don’t get a coherent answer I usually order water.

The answer here?  “19gr in 36 out”.  Off to a good start.

Culture 36
Culture 36

I got a flat white and my 8yr old daughter got a hot chocolate.  Both came with well crafted latte art, and my daughter says her’s was better (a nice 3 level tulip).  The coffee is from Heart Roasters in Portland and is very nice (a nice legit medium roast…not typical 3rd wave under-roasted pseudo medium).   If the coffee strikes you the right way, you can purchase a bag to take home.

The shop it self is reasonably sized for NY which is a treat…there’s room to sit and actually move.  And, if you are a WiFi junkie, there’s free WiFi here.  The music selection was also very nice.   Wilson Pickett was on when I walked in.

Another nice feature of Culture 36 is their house baked cookies.  The chocolate chip cookie we had was large, moist and gooey…just how it should be.

If you are in the theatre/dance world and spend stupid amounts of time at Ripley Grier, check this place out.

Coffee to Water Ratio

Every major coffee company has specific instructions on how to make coffee using different methods.  So, here’s mine.  I do *exactly* the same thing for Aeropress and Hario v60 Pourover.  I use a 1:19 ratio coffee to water ratio…or for you mathematically challenged, that’s 13.5gr coffee and 260gr water.  And yes, I weigh out my coffee and water for these methods.   To make things a bit faster, I have a metal frothing container that I marked so I can just fill it to exactly 260gr (btw…1ml of water weighs 1gr…fun chemistry fact.)

For the pourover, I like to use the glass v60 #2 cone.  My general method for BOTH starts out the same (taking for granted all the steps like warming the vessels, etc):

  • Boil your water.  However you want to do this, electric kettle, stove top, whatever, get the water going.
  • Prepare your vessel…assemble the Aeropress, get your filters ready, etc
  • Weigh out your beans

Now, here’s an important bit to help with consistency.  When your water boils, shut off the heat.  Use the water right away to WARM your vessels…not brew.  Now, CALMLY (no need to rush) grind your beans, dump the warming water and fill your device with the ground coffee.  Doing this will all become second nature quickly, and it will basically guarantee that you have let the water cool to the target brewing temp.

  • Bloom the coffee for 30 sec.  Start a timer and pour about 50gr of water.  But, don’t just pour it in.  Stir the crap out of it for 10 sec to make sure all the grounds are wet.  In the Aeropress, you can just swirl the tube vigorously.  Also, for the Aeropress, I use the inverted method.

Now, here’s where the 2 methods differ

  • Aeropress
    • Slowly pour in the rest of the water
    • At the 2:30 mark, stir the slurry gently a few times and put the cap on
    • At the 3:00 mark, turn over and press.  This should take about 20-30 sec to press completely.  If you press to hard, you will “blow out” the filter and push grounds into your cup, and too slow, you will over extract the coffee.
  • v60 Pourover
    • Start to slowly pour the rest of the water using the concentric circle method.  Make sure you finish at the outside of the grounds bed to ensure that ALL the grounds are getting extracted.  This should be done slowly taking at least 60sec.
    • Once all the water is poured, lift the filter cone a few inches and drop it.  This will shake the slurry down to the bottom and make sure that ALL the water passes through ALL the grounds.
    • At the end, you should see the grounds bed dry out almost completely evenly and all at once (look up Matt Perger’s demo for a v60 pourover).

If you don’t have a gram scale, get one.  You can get a very usable one fairly cheap at Amazon like this one.   Using volumetric brewing methods is the single easiest way to have superior consistency.  And, once you weave it into your routine, it is quite fast.

Now, how to adjust.  DO NOT change the coffee to water ratio.  Change your grind!  If the resulting brew is thin and sour, grind finer.  If the brew is strong and bitter, grind coarser.  That’s it.  You can play with water temp if you want.  But, if you stick with the simple routine above of boiling, then grinding, you will be using water that is in the perfect target range every time.  This entire process will take no more than 5 min (10 if you really take your time).